Create Bookings
You must complete all booking steps described in this chapter to successfully place a booking.
0.0 Select Transport Mode
![]()
- In the “Booking” eService, select “New Booking”
- Click on the Transport Mode for which you want to create a Booking
Select Multimodal FCL or Multimodal LCL for cargo transport by train from China to Europe.
0.0 Booking Step 1: Enter General Information
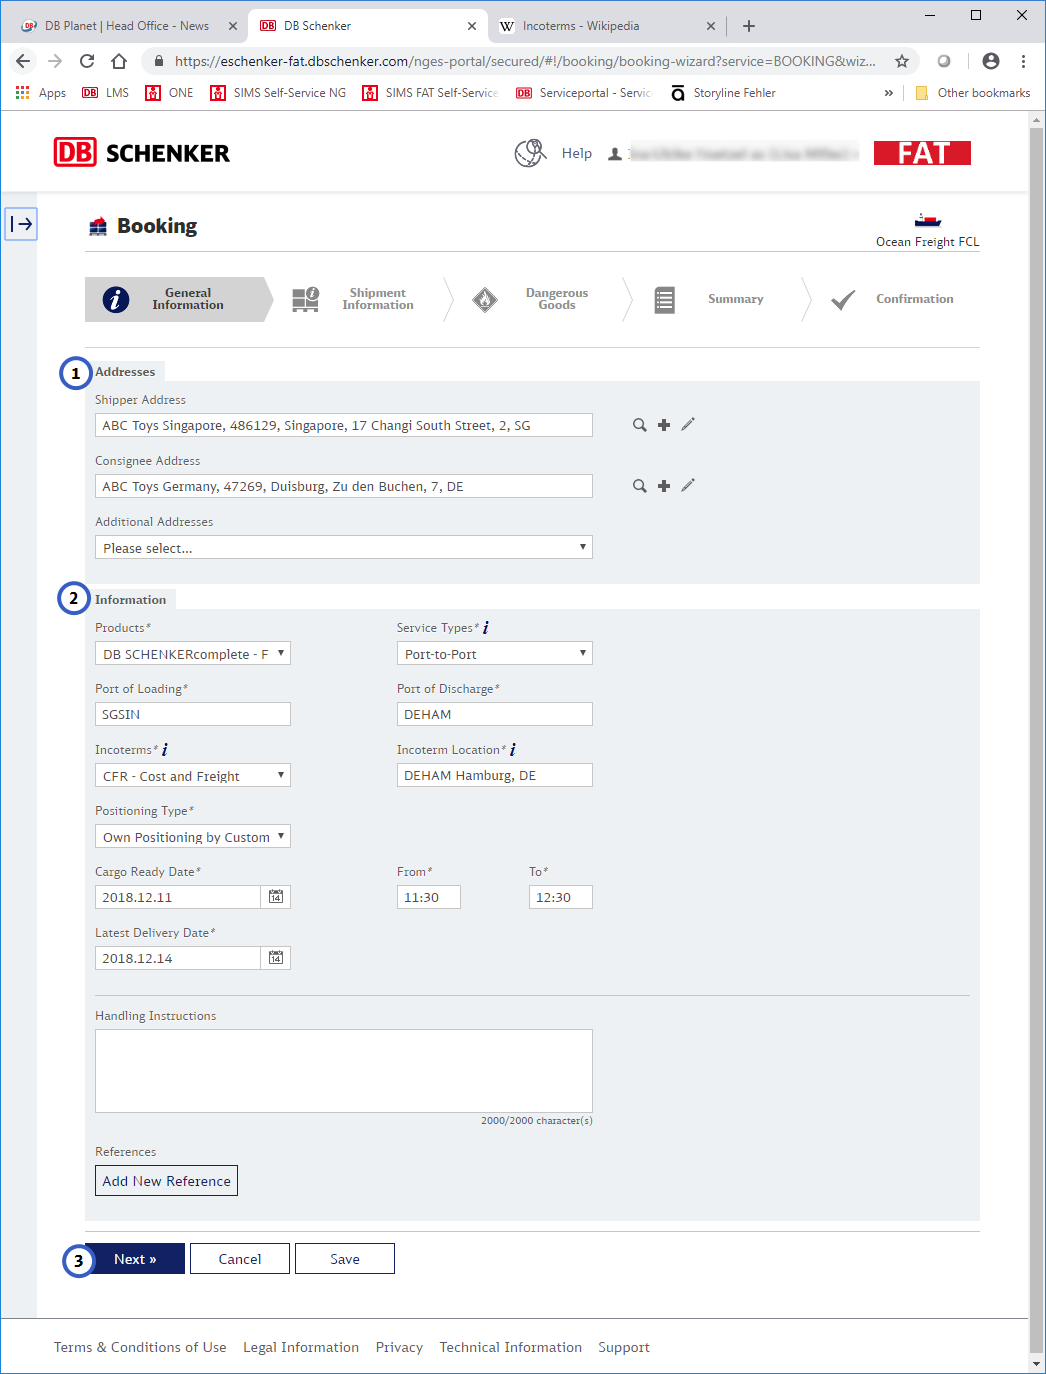
- Enter all relevant details in the Addresses area
In the address fields, search for the addresses from your Address Book, or create a new address in the Address Book. See Using the Address Book for instructions on how to use the Address Book.- Mandatory Addresses: Shipper and Consignee address are mandatory. It is possible to select the same address for Shipper and Consignee: if this is the case, then you must add a different Pickup and / or Delivery Address.
- Optional Addresses: All other address types are optional, but they may have been configured as mandatory fields for your user group. Up to six address types can be entered: Shipper, Consignee, Pickup, Delivery, Notify and Invoice address. Use the “+” and the “-” icons to add more address types or remove address types that are not needed.
- Notify Address: If you have entered a Notify Address, then you can insert further email addresses where the Notify Confirmation Mail will be sent when you submit your booking.
- Neutral Shipping (selected countries Land freight only): If you select this option, you must specify how you want the invoice to be delivered. You can have the invoice sent to the real shipper (Pickup Address) or the invoice can be sent based on Incoterms or Invoice Address.
- Mandatory Addresses: Shipper and Consignee address are mandatory. It is possible to select the same address for Shipper and Consignee: if this is the case, then you must add a different Pickup and / or Delivery Address.
- Enter all relevant details in the Information area
All mandatory fields are indicated by an asterisk “*”.
For details on the available fields see the table below.Field / Option Details Products Select a Product. Depending on the Transport Mode a product may already have been defaulted.
Air: If you want to send dangerous goods using airfreight, you must select the product “DB SCHENKERjetcargo special”.Service Types Select one of the available Service Types.
Ocean FCL options: Door-to-Door, Port-to-Port, Port-to-Door, Door-to-Port.
Ocean LCL options: Door-to-Door, CFS-to-CFS, CFS-to-Door, Door-to-CFS
Air options: Door-to-Door, Airport-to-Airport, Airport-to-Door, Door-to-Airport.
Land options: Door-to-DoorLocation fields The mandatory locations differ, depending on Transport Mode and selected Ser-vice Type. For example, Pickup Location, Origin CFS Location, Departure Air-port, Port of Loading. Fill in all mandatory locations.
Land: No additional Locations need to be specified, the locations have already been defined in the address fields.
Ocean: Type in the 5-letter UN Location Code (e.g. SGSIN) or port name (e.g. Singapore) you want to use, and the system will show you the matching re-sult(s).
Air: Type in the 3-letter airport code (e.g. SIN) or airport name (e.g. Singapore) you want to use, and the system will show you the matching result(s).Incoterms Incoterms provide a set of international rules, published by the International Chamber of Commerce (ICC), for the interpretation of the most commonly used trade terms. Incoterms help to clarify responsibilities between buyer and seller engaging in foreign trade.
Select the suitable Incoterms for your booking.Incoterm Location The Incoterms location specifies where the costs and risks will be transferred from Shipper to Consignee.
Depending on the selected Incoterms a location may be defaulted. If no location is defaulted, type in the 5-letter UN Location Code (e.g. SGSIN) or location name (e.g. Singapore).EKAER Applicable Land Transport to Hungary only:
If the Consignee has a Hungarian address, then you must indicate if the ship-ment is EKAER applicable or not. If yes, enter the EKAER Number.SENT applicable Land Transport to and from Poland only:
If SENT is applicable, enter the SENT Number and the SENT update key you received during the transport registration on PUESC Platform.Precarriage Air and Ocean LCL only:
This field determines if Precarriage will be arranged by Schenker (Pickup Re-quest), or the customer will deliver the cargo to CFS (Ocean LCL) or AirPort (Air).Positioning Type Ocean FCL only:
This option determines if a customer uses an own container (Positioning by customer), or if Schenker provides the required container (Positioning by DB Schenker)Date fields Depending on the Transport Mode and Service Type, different dates must be entered, together with the applicable time.
Note that if you enter the same day dates (today), the system will calculate the applicable “From” time based on the configuration, e.g. user’s time + 45 minutes.
If the user’s time is 6 a.m. on the same day, then the default setting time remains (e.g. 8:30a.m.).Handling Instructions Enter your handling instructions. Depending the configuration, you may also have to select a “Type of Handling Instructions”. References If required, click “Add New Reference” to add references. Select a reference type from the list and enter the reference number. The same reference type can be selected multiple times. - Proceed with your Booking
Click the “Next” button to proceed to the next booking step.
The system validates if all mandatory fields are inserted. If not, missing fields will be marked in red, and a red will be displayed where selections are missing.
If you do not want to proceed with your booking now, choose one of the buttons below:- Cancel: Click “Cancel” to leave the booking without saving.
- Save: Click “Save” to save your booking and edit it another time. Note that Save will not transmit the booking data to Schenker.
- Cancel: Click “Cancel” to leave the booking without saving.
0.0 Booking Step 2: Shipment Information
Ocean FCL only
For Ocean FCL Shipments some additional steps are required to capture container details.
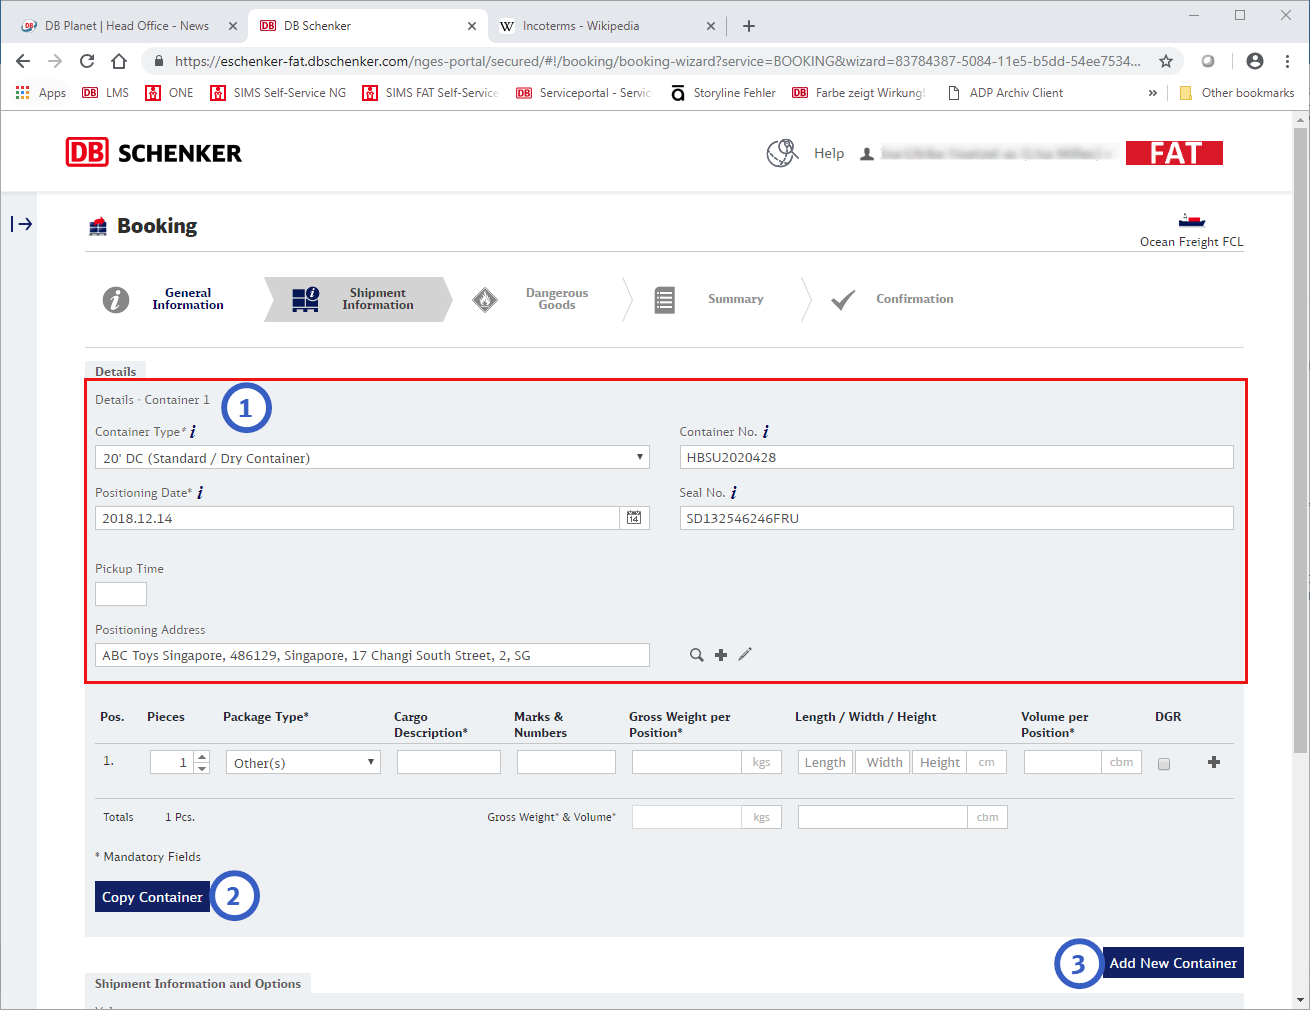
- Ocean FCL only: Enter Details – Container
Add all relevant information on the container to the fields in this section. “Container Type” and “Positioning Date” are mandatory fields. - Ocean FCL Only: Copy Container, if required
If you need to enter data for several containers, and the data is similar, you can use the “Copy Container” button. Click the button and specify how many container copies you need. - Ocean FCL Only: Add New Container, if required
If you need to enter data for several containers, but the data differs considerably, click the “Add New Container” button.
In addition to the steps above you must also complete all steps shown below for Ocean FCL.
All Transport Modes, including Ocean FCL
For all transport modes, including Ocean FCL the following cargo details need to be captured.
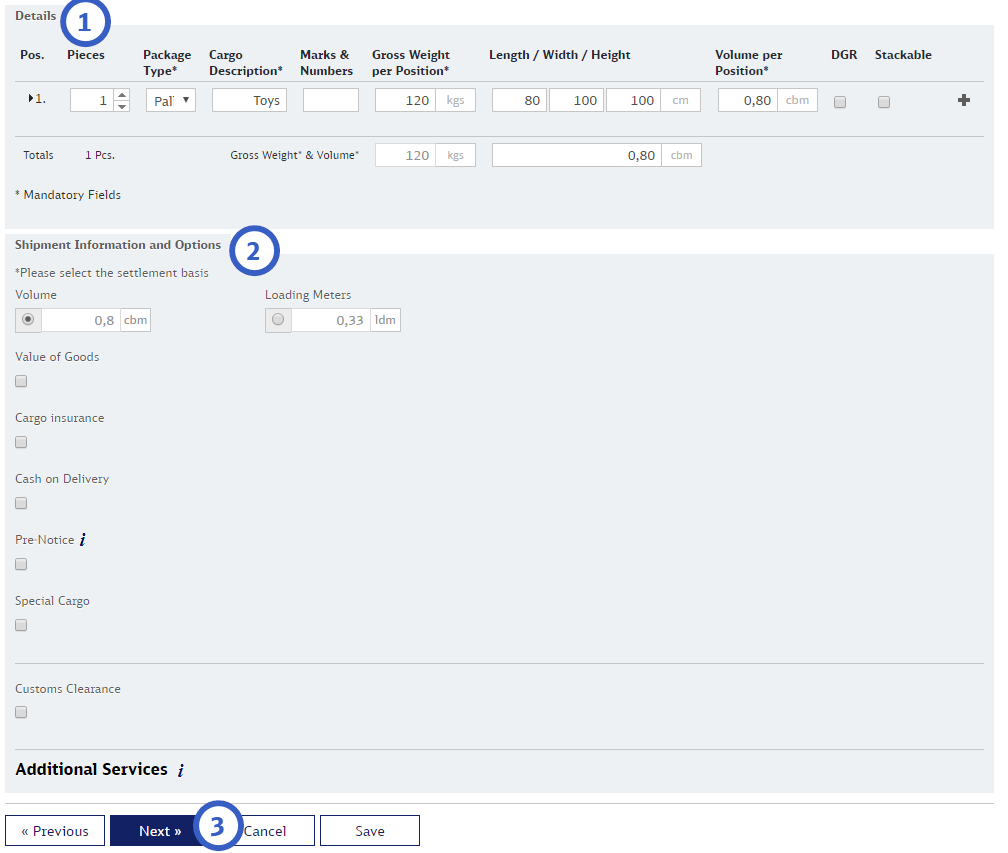
- Enter Cargo Details
Add all relevant information on the shipment positions to the fields in this section. Mandatory fields are marked with an asterisk*.
Dangerous goods: If the checkbox for DGR = Dangerous goods is checked for at least one shipment position, the dangerous goods entry screen will be show when you click the Next button. For Air shipments the following restriction applies: you can only mark cargo as dangerous goods, if you have selected the product “DB SCHENKERjetcargo special” in the previous booking step. - Enter Shipment Information and Options
In this section you can add additional options for your shipment. Which options are available depends on the Configuration, the Transport Mode and Service Type.
If you select any of the available options additional fields may appear which require your input.
For details on the available options see the table below.Field / Option Details Volume / Loading Meters Land Transport: You must select either Volume or Loading Meters as the settlement basis. The Volume and the Loading Meters are calculated from the Cargo Details.
Ocean / Air: The Volume is calculated automaticallyEquipment Land Transport Direct Only: If you select this option, then you must specify what kind of truck is required for your shipment. De-pending on your choice of truck, there may be more truck options you need to define (for example: Tail Lift). Load Securing Equipment Land Transport Direct Only: If you select this option, then you must specify what kind of Load Securing Equipment is required and the amounts that are needed. You can add more than one type of Load Securing Equipment. Pallet Exchange Land Transport Direct Only: If you select this option, then DB Schenker will take back exactly the same number of empty pallets in the same quality as the shipment consists of. Mixed Loading Re-strictions Land Transport Direct Only: If you select this option for your LTL booking, then you must name the restrictions/details for the re-striction (e.g. clothing and tires). If you select this option without further explanation the booking will be treated as FTL. Transshipment Restriction Land Transport Direct Only: If you prohibit that the cargo is han-dled and reloaded, the cargo will be treated as a direct transport. This can lead to the cargo being treated as FTL independent of the tradelane, or a higher rate due to planning restrictions. Subject to negotiation between DB Schenker and customer. Value of Goods If you select this option, then you must also specify “Value of Goods” and “Currency”. Cargo insurance
If you select this option, then you must also specify “Insurance Val-ue” and “Currency”.
Special Cargo Air and Ocean Only: If the checkbox for “Special Cargo” is checked, then the special cargo must be specified, for example if you want to send fragile goods. Customs Clearance
If you select this option, then Schenker will do the Customs Clear-ance for this booking.
Print CMR Land Transport Only (for selected countries): If selected, the responsible DB Schenker branch will send the CMR document to a defined recipient. If you select “Print CMR”, then you must also insert an email ad-dress. Cash on Delivery
Land Transport Only (for selected countries)
Prenotice Land Transport Only: Consignee will receive a notification at a configured time before delivery. - Proceed with your Booking
Click the “Next” button to proceed to the next booking step.
The system validates if all mandatory fields are inserted. If not, missing fields will be marked in red, and a red will be displayed where selections are missing.
If you do not want to proceed with your booking now, choose one of the buttons below.- Previous: Click the “Previous” button to return to the previous booking step.
- Cancel: Click “Cancel” to leave the booking without saving.
- Save: Click “Save” to save your booking and edit it another time. Note that Save will not transmit the booking data to Schenker.
- Previous: Click the “Previous” button to return to the previous booking step.
0.0 Booking Step 3: Dangerous Goods
The Dangerous Goods screen will only be shown if the shipment contains dangerous goods.
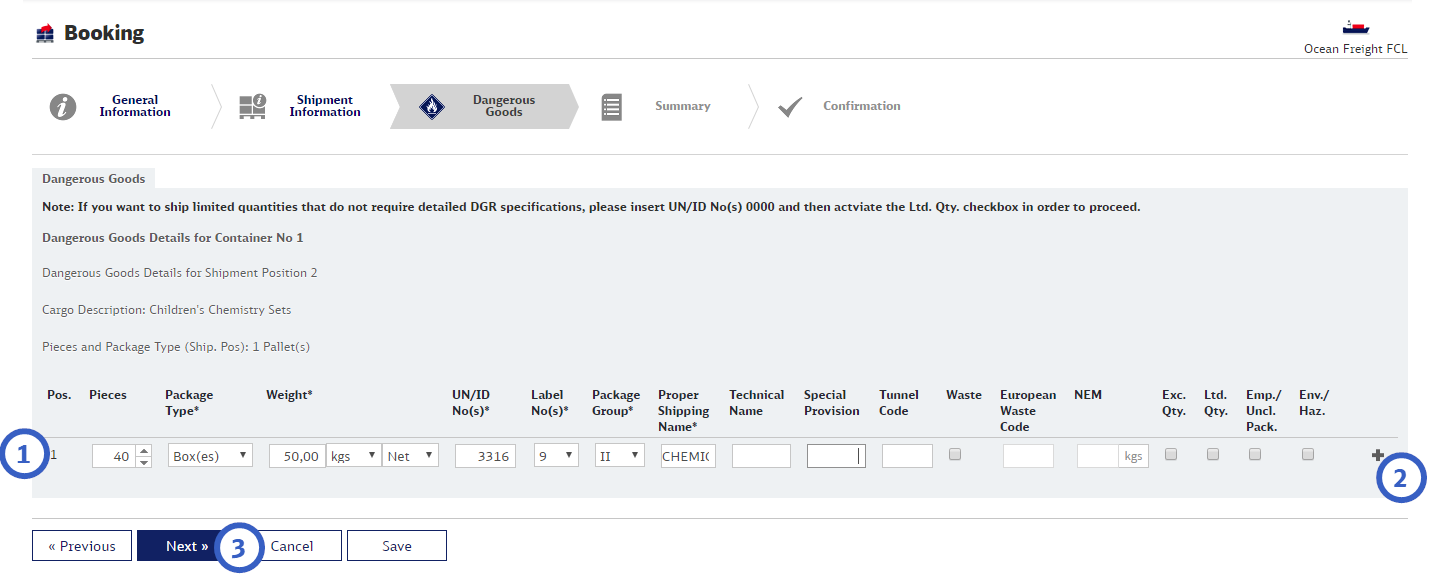
- Enter Dangerous Goods Details
If you have marked the DGR checkbox in the previous step, you must complete in the Dangerous Goods screen.
When you enter the UN/ID No(s), the system will default relevant details based on the DGR database.- Limited Quantities: If you want to ship limited quantities that do not require detailed DGR specifications, insert UN/ID No(s) = 0000 and then activate the Ltd. Qty. checkbox to proceed.
- Net Explosive Mass: If you want to ship NEM (Net Explosive Mass) enter a valid UNID and valid Label No(s). Make sure that all added values are correct. The system will remind you to recheck the values.
- Limited Quantities: If you want to ship limited quantities that do not require detailed DGR specifications, insert UN/ID No(s) = 0000 and then activate the Ltd. Qty. checkbox to proceed.
- Add more lines to the Dangerous Goods table
If you have more than one DGR entry, use the “+” icon to add another line. User the “-” button to remove lines you do not need any more. - Proceed with your Booking
Click the “Next” button to proceed to the next booking step.
The system validates if all mandatory fields are inserted. If not, missing fields will be marked in red, and a red will be displayed where selections are missing.
If you do not want to proceed with your booking now, choose one of the buttons below.- Previous: Click the “Previous” button to return to the previous booking step.
- Cancel: Click “Cancel” to leave the booking without saving.
- Save: Click “Save” to save your booking and edit it another time. Note that Save will not transmit the booking data to Schenker.
- Previous: Click the “Previous” button to return to the previous booking step.
0.0 Booking Step 4: Summary
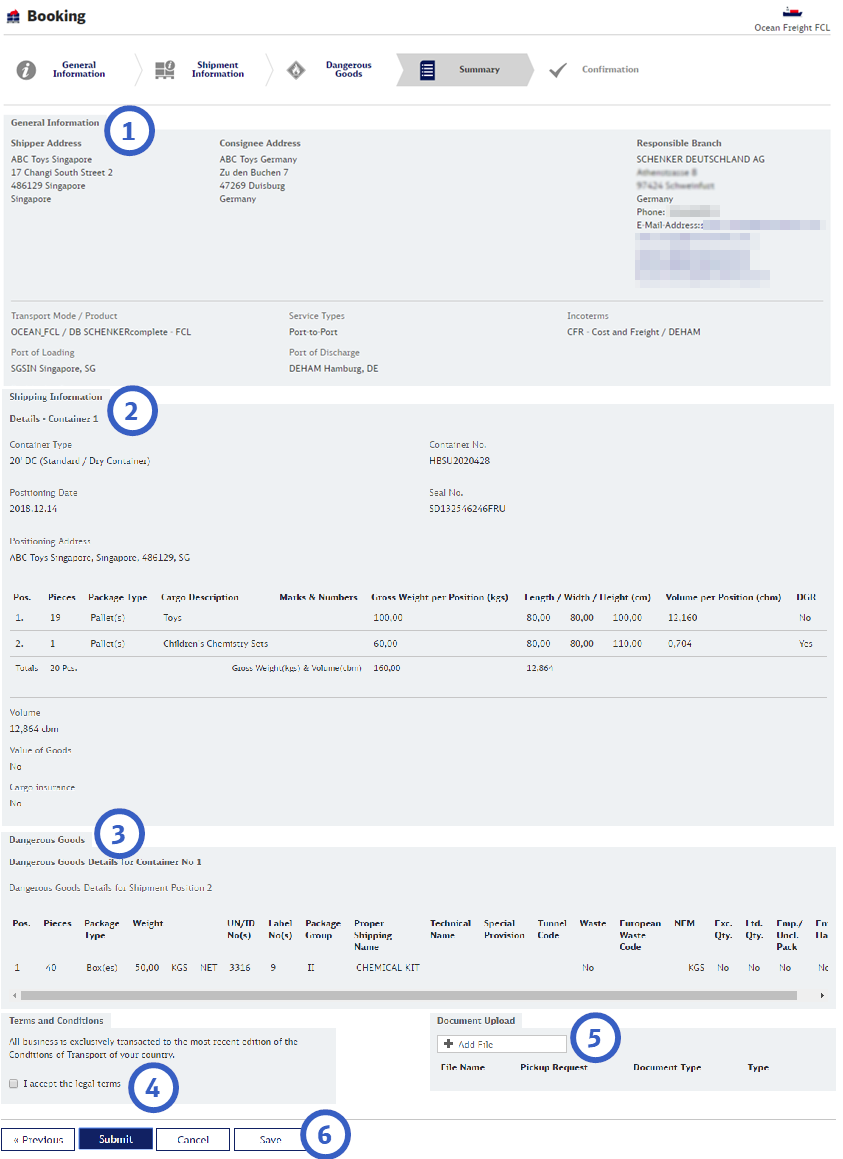
- Check General Information
Do a final check of the general information you have entered in the first Booking Step. - Check Shipment Information
Do a final check of the shipment information you have entered in the second Booking Step. - Check Dangerous Goods details
Do a final check of the dangerous goods details you have entered in the third Booking Step. - Accept Terms and Conditions
Mark the checkbox. Depending on your configuration the box may be preselected. - If applicable, upload document(s)
Click in the Add File field. Select the file you want to upload, then specify what type of document the uploaded file is (for example: Commercial Invoice, Dangerous Goods Documents, Packing list). - Submit your Booking
Click the “Submit” button to finalize your booking.
If the booking has been created successfully, an email confirmation is sent to the email address which has been provided in the customer account. Furthermore the responsible branch receives an email notification, which contains the customers country code to identify the bookings origin.
If you do not want to submit your booking now, choose one of the buttons below.- Previous: Click the “Previous” button to return to the previous booking step.
- Cancel: Click “Cancel” to leave the booking without saving.
- Save: Click “Save” to save your booking and edit it another time. Note that Save will not transmit the booking data to Schenker.
- Previous: Click the “Previous” button to return to the previous booking step.
0.0 Booking Step 5: Confirmation
Your Booking is now completed. The Confirmation page offers you additional options regarding your booking.

- If required, download the Booking Summary pdf
This is the same document that is sent to your email address. - Land Transport only: If required, start label generation
Select in which position the first label will be printed.
For example, if you choose Label 1, the first label will be printed on top left of the page; if you choose Label 2, the first label will be printed on the top right of the page.
If you choose “Continuous” the generated pdf labels will be suitable for printers creating continuous printouts. - Land Transport only: If required, generate labels
You have two options to generate labels:- Print button: Opens the pdf containing the labels directly from your browser
- Send button: Sends the pdf containing to the labels to the email address you have entered.
- Print button: Opens the pdf containing the labels directly from your browser
- If required, Create further Bookings
- Create another Booking: Use this button to start another booking from scratch.
- Duplicate Booking: If you have a similar booking use this button to create a booking with the entries of the previous booking. Adjust the values as needed.
- Create another Booking: Use this button to start another booking from scratch.